
|
Stud.IP Dokumentation
|
Search for coursesTo quickly access a specific course, there is a central search machine in Stud.IP, the Course browser. It gives you different options to rapidly and effectively find the desired course. To find the Course browser, click on Search for courses in the My courses view, or select Add course on your Start page, or use the icon on the Header bar, as follows:  Click on the icon for the Search pages and then on Search for courses. The Course browser appears in a form similar to the one shown below as soon as you activate it:  The Course browser is divided into two main areas, which provide you with completely different search opportunities:
Additionally, there is a Result list for the result of a search or of browsing. We went to great lengths to make the structure of the Course browser similar to the classic search pages (such as Yahoo) in order to make its operation as simple as possible for you. Above the Course browser proper you see different tabs with course categories. When you click on one of the tabs, you are transferred to the Category view. Here you can have all the courses of the respective category displayed or search further within the category with the Course browser. In addition, the so-called Top lists are displayed in the category. They are also appropriate for rummaging around. In the Top lists you see at a glance which are the most attractive and interesting courses. It is also obvious which courses were created most recently. The Search box In the Search box you can locate a course by entering a search term. Normally, you are in the Quick search mode in this context. If you click on “Extended search” you enter the Extended search mode, which provides you with detailed access to different data fields. The Extended search is advisable if you already know exactly what you are searching for — for example, courses with specific names or lecturers. The Quick search The Quick search allows you to find one or more specific courses quickly and efficiently. You can select the areas across which you desire to search with the List box on the left side. In this context, you have the possibility of using the following search options: Search for:
In all probability you will most often use the Everything search option. In this context, the term entered in the Lecturer, Title, Subtitle and Commentary fields is searched for. If you search in the Lecturer field, only the name of the lecturer who is in charge of the respective course is searched for. Title includes the Title and Subtitle fields. Commentary only searches through the commentary text.  It is advisable to only enter one search word. If you enter more than one term, the entire search term is searched for, i.e. there is no AND linkage between the words entered occurs. Linkages can only be specified in the Extended search. It is advisable to only enter one search word. If you enter more than one term, the entire search term is searched for, i.e. there is no AND linkage between the words entered occurs. Linkages can only be specified in the Extended search. You find courses from previous terms (semesters) in the Stud.IP Archive. You find courses from previous terms (semesters) in the Stud.IP Archive. If you leave the Search field blank and click on Start search, all the courses are displayed If you leave the Search field blank and click on Start search, all the courses are displayedThe Extended search Wenn Sie auf erweiterte Suche klicken, erhalten Sie ein anderes Suchfeld, das so aussieht:  In the Extended search, you have the opportunity to enter exact search terms in the following fields:
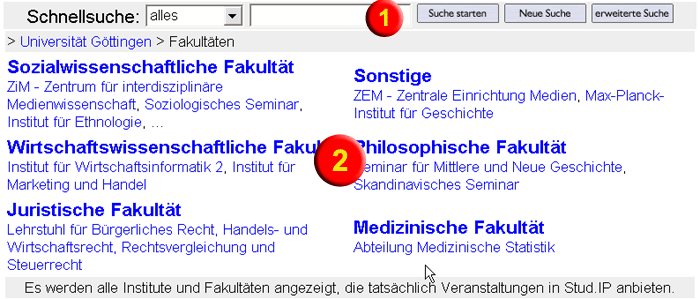
Additionally, there is also the “Linkage“ box, in which you can specify whether you desire to link the terms with "AND" or with "OR". Normally, linkage with “AND“ is advisable. Each of the corresponding Search fields search through the respective field of the course. In the search for areas, care must be taken that the selection of a subject (the headings in the list of areas) does not result in a search restriction; in that case all courses will be shown. In the Extended search you can also search for future terms. Previous terms are blended out because those courses can only be found in the Archive. If you click on Quick search , you return to the simple search mode. After each started search, a results list is displayed (see below). The Browse box The Browse box is very suitable for searching if you do not exactly know which courses you are searching for. In the Browse box you can browse through the different categories and thus allow all the courses of an institute or a certain subject area to be displayed. In the Browse box you first are given an overview of all the faculties and some institutes of these faculties. You can click directly on a faculty or an institute in order to move directly to that level:    Generally, you can click on anything that is located in the browse field, and you will be transferred to the next respective level. Generally, you can click on anything that is located in the browse field, and you will be transferred to the next respective level. You will find the "Back one level" link at the bottom left on all levels except for the first one. When you click on the link, you will be returned to the previous level. You will find the "Back one level" link at the bottom left on all levels except for the first one. When you click on the link, you will be returned to the previous level.However, the lines (1)-(5) are simpler. There you will find the complete sequence of your search. You can return to any arbitrary level and begin again from there. The different levels are structured as follows. In round brackets you see the number of all the courses in the subject area.. 
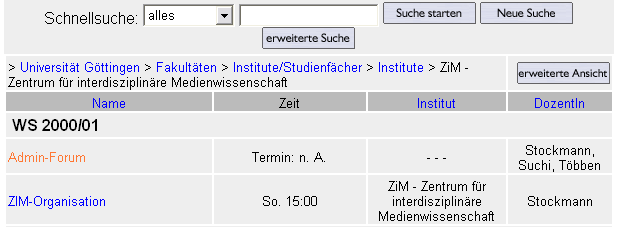
In the above sample image all the fields of study in a faculty are displayed. Click now on one of the areas, and all of the courses in the subject area will be displayed. The Result list At the end of each search or after completion of browsing a result list is displayed. The Result lists are normally shown in the normal view, in which the most important data of the course are shown. The name of the course, the course appointment, the home institute and the lecturer are displayed:  However, you can change to the Extended mode, in which you click on Extended views. In the Extended view, additional information with regard to read and write permissions as well as one’s own status and that of the course are displayed. If you have previously started a search, the number of hits is shown in the Result list header; if you have come from the Browse field, you see the path you have followed in the header. If you click on a Course title, you are shown the detailed view of the course options and can enrol in the course there.  If you click on the respective column heading, the result list will be sorted according to this column. If you select Lecturer sorting, the courses which have several lecturers will be also be displayed several times — so do not be surprised, this is still as it should be! If you click on the respective column heading, the result list will be sorted according to this column. If you select Lecturer sorting, the courses which have several lecturers will be also be displayed several times — so do not be surprised, this is still as it should be!Traffic light switching in the Extended view In the Extended view you see a traffic light which elucidates the read and write permissions which apply to you in this course:  Green traffic light: You can read or write in this course. No course password has been set. Green traffic light: You can read or write in this course. No course password has been set. Yellow traffic light: You can read or write in this course; however, in order to do so you must know the course password. Yellow traffic light: You can read or write in this course; however, in order to do so you must know the course password. Red traffic light: Neither reading nor writing is allowed with your current personal status. In all probability, you first have to answer the Conformation mail. Red traffic light: Neither reading nor writing is allowed with your current personal status. In all probability, you first have to answer the Conformation mail.
| ||
| |||