Course overview
- Please click on the My courses menu item on your Start page:
–>
or use the corresponding icon on the Header bar:
A page similar to the following screen appears:
In this area you see all the courses that you are taking in the current semester.
Since the system does not yet know your schedule, only those courses for which you have been automatically registered appear in the specimen image it is the Feedback, Frustration and Culture Forum. Here you can already see several of this page's features: 
- The white bar at the beginning of the column points out the group to which the course has been assigned. With the Paint pot icon you can subsequently arrange your courses according to semesters or fields of study to achieve greater clarity.
- Name designates the courses name. With a click on it you enter the course area.
- Under Content you will find up to eleven icons. All of them function similarly and are abbreviations for entry into specific areas of a Stud.IP course.
 stands for Postings and contains the number of forum contributions in the area. If new entries have accumulated since your last visit, the icon turns red:
If you linger for a moment with the cursor on the icon, the number of all the old and new postings in the course will be displayed.

All of the icons described in the following also have this function. Lingering with the cursor on one of them shows the number of old and new items in the respective area in each case.
 stands for Documents and functions analogously to Postings. It shows the number of uploaded files. If new entries have accumulated since your last visit, the icon turns red:
 This icon represents News about the course. This can be rather important in some cases, i.e. short-term room changes or similar items are normally communicated via this News icon. The latest News is therefore also represented by signal-red:
 denotes Content. You will have to find out for yourself exactly what this stands for because the instructors may set up this page any way they like. Content can be links, pictures or even something completely different. Changes to this page are indicated by:
 stands for the Reference list of the respective course. There you will find recommended or interesting literature on the subject. You see new entries at a glance:
 means that a special course meeting has been scheduled. New course appointments (dates) are naturally depicted, as your probably expected, in red:
 provides access to a courses WikiWikiWeb. A wiki is a collaborative working environment in which a number of people (in this case all the courses participants) can work together on one or several documents. They can be mutually linked. As the Stud.IP Wiki also provides a version manager, it is suitable for, e.g., preparing presentations in group work. You can find more information on wikis here. If new pages have been added to the WikiWikiWeb or if someone changes a text the icon is coloured:
 indicates that a Poll or a Multiple-Choice-Test test has been scheduled in a course. Polls are polls or surveys. Thus, in this case your opinion is desired! New polls are naturally recognizable on their you already expected it bright red icon:
 represents a course's Chat room. All of a courses participants have the right to use the courses Chat room. When one or more person(s) are doing this, the icon begins to blink:
 This icon means that the course is linked to a Learning module. Learning modules can provide all types of multimedia contents. New learning modules are shown in red:
 With the exit symbol you can cancel your enrolment in the course you then no longer appear on the overview page. If you do not see this icon, you are either a tutor and as such have to be released by your instructor or you are the instructor of the course in that case you cannot dispense with yourself.

Cancel your enrolment cautiously. In a database-based system such as Stud.IP there is no Undo function. If you have accidentally cancelled your enrolment, you must re-enrol in the course.
Even when the semester is over, you should keep your enrolment. If the courses are archived by an administrator, you disappear from your overview page but if you were still registered as a participant up to that time, you could access the archive.
Now enter a course, by clicking at the name.
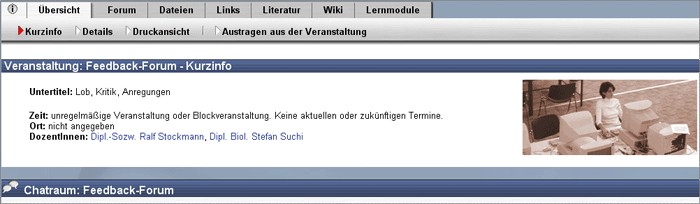
You are transferred into the courses Overview area:
The operational logic of the course area corresponds to an index file with tabs.
If one clicks on one of the tabs (Forum overview, Schedule, etc.), it moves into the foreground and offers additional subpages; for example, the Overview Tab has the following subpages:

Quick Guide

Details
Print view
Cancelling the course
A red arrow indicates which of the subpages you now see. Grey arrows indicate what the tab additionally contains. If you click on a grey arrow, you thus advance to the next subpage.
To test your knowledge, please click on the Schedule tab. Here you see the course dates in this area.
Then move to the Forum" tab. You now see a list of subjects to which you can make contributions.
Our system thrives on interaction. To profit from this, we also have to know what is causing you problems or which features you think are missing. Therefore, please do not hesitate to express your opinion in the
Feedback-Forum!